Help Centre
Latest app updates (highlights)
Android
Version 2.5.7 (12 February 2024)
After updating to version 2.50, you may have noticed that some smaller photo sizes are no longer available for selection due to migrating to new camera APIs.
In version 2.5.7 the photo quality selection for autosaving, exporting and emailing photos was updated to give users a greater range for reducing the size of photos. This will assist users who require smaller file sizes for storing photos.
IOS
Version 2.19 (27 February 2024)
After updating to version 2.19, you have the option to select between JPG and HEIC photo extensions, with HEIC set as the default for exporting, auto-saving and emailing photos. You can switch between either format under the “Export” section of Solocator settings – see screenshot.
How do I add or change notes to stamp onto photos?
There are three text fields used in the Notes Overlay feature. Two text fields, “Project Name” and “Description“, are controlled from the camera view’s pencil button in the bottom right corner.
- Grey Pencil: Notes Overlay Disabled – No project name or description field prompt. However, you can edit this later from the photo album within Solocator.
- Green Pencil: Notes Overlay Enabled. Prompts the user with a pop-up for new notes or editing existing previous notes after snapping a photo.
- Red Pencil: Notes Overlay Locked. This option locks the previous notes, and the user can take photos with the same notes with no prompt. So you don’t have to tap ok or wait for the pop-up.
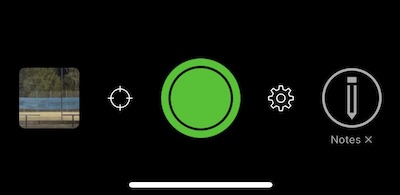
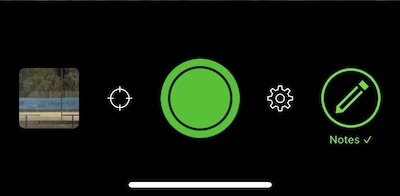
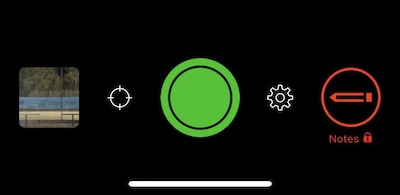
NEW! From v2.14, the iOS version of Solocator also allows the option to tap the Project Name and Description areas on the camera to add or edit notes fields before taking a photo. This is handy when NOTES are locked (red pencil). Read more here
A third text field 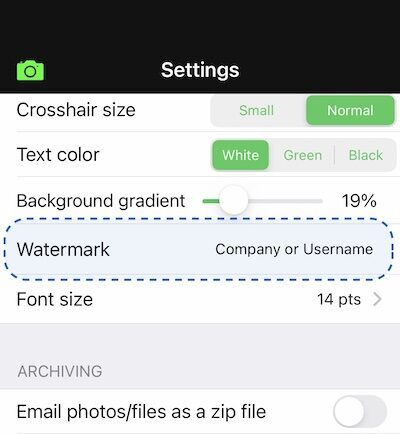 called “Watermark” sits under the description field and is edited from the Settings screen under the Notes Overlay section. This field is typically used for the photographers or company name.
I can't email photos. It says I do not have an email account. How do I set this up on my iPhone?
The emailing function in Solocator calls up your default email account entered in the Apple Mail app. If you have not set up an email account using Apple Mail app, you will get a prompt saying you do not have an email account. Here are the steps to set up your email account to be used by the Apple Mail app and therefore used by Solocator when emailing photos/files. https://support.apple.com/en-au/HT201320
If you use another email app, you may select “Share photos” or “Export” via the share sheet and use an alternative email app. However, some information will not be added to the email body like the standard default function.
How can I make text fields larger so it's easy to type when out in the field? (iOS)
Sometimes, it’s hard to see the text when typing in the Notes Overlay fields because of bright sunlight or in shady spots.
If you have this scenario, you can change the size of the Notes Overlay fields from the default size following the steps below:
- Open the Solocator app and swipe down from the top right-hand corner to open the control centre. If you have an iPhone 8 or earlier or an SE model, swipe up from the bottom middle to access the control centre – more details here https://support.apple.com/en-au/HT202769
- Tap onto the “aA” button.
- Slide up to a percentage greater than the current percentage size % and select “Solocator Only” below for the new text size chosen.
- Tap anywhere on the blurred space on either side of the percentage scale to go back to the control centre, and then swipe to hide the control centre and go back to Solocator.
See the “How To” article with a step-by-step guide with screenshots plus the option of voice-to-text.
How do I email KML or KMZ files?
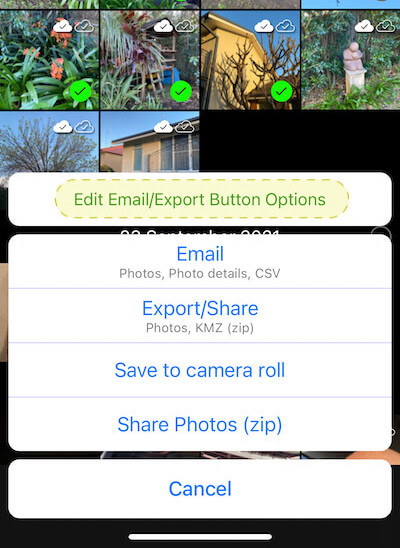
After selecting photos and tapping the action button bottom left in the Solocator library, tap on the edit email/export button options (yellow highlight). You can select from photos, photo info, maps, KML, KMZ and CSV files to either email or export. For a detailed step-by-step guide, click here or select the How To section.
Can't get the Industry Pack to work on my Android device
If your Android device is not recognising the Industry Pack, please try either of the following:
- Close the app and then open it up again or
- Do a simple restart of your device to re-establish the link to Google Services.
The above fixes the issue for most users. It could also be that you’re not in good cell coverage and unable to connect to Google Services.
We have a new app update coming out shortly, including a fix for this bug.
Header Photo by Matthew Waring on Unsplash
Can’t find what you’re looking for?
We’re writing new articles regularly so let us know what you need.
