FAQ
Frequently asked questions
How do I add or change notes to stamp onto photos?
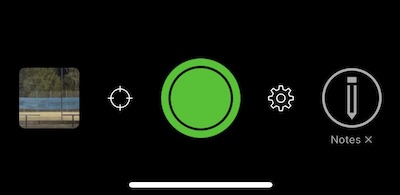
There are three text fields used in the Notes Overlay feature. Two text fields, “Project Name” and “Description“, are controlled from the camera view’s pencil button in the bottom right corner.
- Grey Pencil: Notes Overlay Disabled – No project name or description field prompt. However, you can edit this later from the photo album within Solocator.
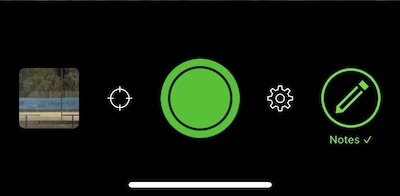
- Green Pencil: Notes Overlay Enabled. Prompts the user with a pop-up for new notes or editing existing previous notes after snapping a photo.
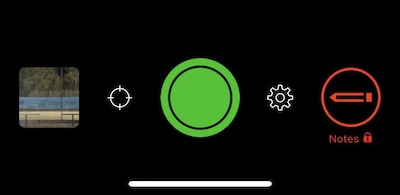
- Red Pencil: Notes Overlay Locked. This option locks the previous notes, and the user can take photos with the same notes with no prompt. So you don’t have to tap ok or wait for the pop-up.
NEW! From v2.14, the iOS version of Solocator also allows the option to tap the Project Name and Description areas on the camera to add or edit notes fields before taking a photo. This is handy when NOTES are locked (red pencil). Read more here
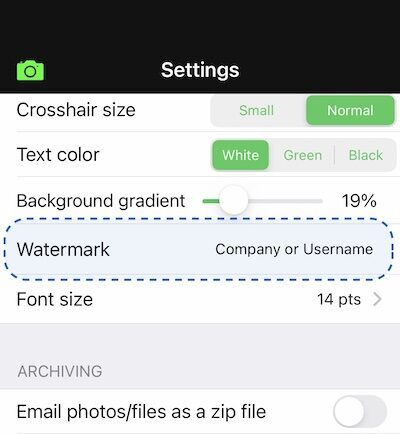 A third text field called “Watermark” sits under the description field and is edited from the Settings screen under the Notes Overlay section. This field is typically used for the photographers or company name.
I can't see coordinates just GPS Data Unavailable
If you are seeing the message “GPS Data Unavailable”, where GPS coordinates should be at the top of the camera view, then permission for your location has not been given in the device settings or accidentally switched off. Please follow the steps below to permit Solocator to use your location by switching on location services.
iOS
- Open device Settings and go to > Privacy > Location Services.
- Make sure Location Services is on.
- Scroll down to Solocator.
- Select “While Using the App“
ANDROID
- Swipe down from the top of the screen and tap on the Settings gear icon
- Then tap on Location
- Make sure the “Use Location switch is turned on
- Tap onto Solocator
- Tap Location permission and select “Allow only while using the app.“
While you are there, check that all other permissions for Solocator are turned on that you require.
My compass is not working on my Android device
Some Android phones/devices do not have a magnetometer (compass sensor) built into them. If this is the case, the compass will not move, and the bearing readings are disabled in the settings screen. Solocator requires a compass sensor to determine the direction, whereas say directions in Google Maps use the change in position to determine your direction.
Temporary solution: If using the Industry Pack, you can switch off the “Capture Modes” (second switch from the top in settings), which removes the compass from the overlays while still using the other geospatial info.
Compass is not showing the correct direction how can I fix it?
Three things to check
- Do you have a cover over your phone that has a magnet? If so, try using the app without the cover to see if that makes a difference.
- Does the default or other third-party compass apps behave in the same way? There may be some magnetic interference, or it may show that the compass sensor has been damaged from the phone being dropped.
-
Calibrate compass as per below.
iOS
- Open the Settings app.
- Tap Privacy.
- Tap Location Services.
- Tap System Services.
- Enable Compass Calibration.
Android
- Open the Google Maps app.
- Check that your position is highlighted with the blue circular location icon.
- Tap on the location icon, which will reveal more information about your location.
- Below the map, tap on the “Calibrate” button, which will bring up the compass calibration screen describing the action to do for calibration.
How can I make text fields larger so it's easy to type when out in the field? (iOS)
Sometimes, it’s hard to see the text when typing in the Notes Overlay fields because of bright sunlight or in shady spots.
If you have this scenario, you can change the size of the Notes Overlay fields from the default size following the steps below:
- Open the Solocator app and swipe down from the top right-hand corner to open the control centre. If you have an iPhone 8 or earlier or an SE model, swipe up from the bottom middle to access the control centre – more details here https://support.apple.com/en-au/HT202769
- Tap onto the “aA” button.
- Slide up to a percentage greater than the current percentage size % and select “Solocator Only” below for the new text size chosen.
- Tap anywhere on the blurred space on either side of the percentage scale to go back to the control centre, and then swipe to hide the control centre and go back to Solocator.
See the “How To” article with a step-by-step guide with screenshots plus the option of voice-to-text.
Photo Storage
Where does Solocator save photos?
Both the iOS and Android apps, by default, save the following photos:
- Saves a photo within the Solocator app
- Saves an original photo to the camera roll without any stamped info
- Saves a stamped photo to the camera roll
(Note: the autosaving to the camera roll can be switched on and off to suit your requirements)
Internal Storage Folder: Additionally, you can autosave photos to your selected internal storage folder on Android devices (v2.80+).
Autosave to Cloud Storage
With the Solocator app + the Industry Pack (In-app purchase), you can select to save an original and or stamped photo to the following cloud services:
- iCloud (iOS only)
- Dropbox
- Google Drive
- OneDrive
You can also save an original photo to one cloud service and the stamped photo to another cloud service or separate folders.
Subfolders
Autosaving photos to the cloud also allows you to save photos under a subfolder, by Date the photo was taken or the Project Name used for the photo.
Does Solocator have a photo backup service?
No, the Solocator app is a native app for iOS and Android. Photos are saved to your device within the app database and auto saved to either your device’s camera roll or selected cloud storage based on the settings you have chosen. Additionally, you can autosave photos to an internal storage folder on Android devices (v2.80+).
Please note:
Since Solocator is a native mobile app, there are no backend services to sync photos to or log into. We don’t store copies of your photos or data; they remain on your device or are shared by you directly.
Can I save photos to my internal device folders?
Yes, both the Solocator iOS and Android apps have the option to export/save photos to the files app for each mobile platform. In both apps, you can select photos from the Solocator library and then share photos to the “Files” app via the share sheet. Photos and files will be saved under the main “Solocator” folder.
Additional options:
iOS
Autosaving Solocator photos to iCloud automatically adds your photos to your device’s “Files” app to view photos on your iPhone or iPad, or via iCloud on your Mac or via a web browser.
Android
In the Android app, when manually exporting photos/files, we have incorporated the option to either save directly to your device’s internal storage or use the share sheet. If you choose to save to the internal storage of your device, you can navigate to a folder of your choice. You can also set this to be a default path and then change it later from the email/export settings.
Emailing, Exporting & Sharing Photos
I can't email photos on my iPhone. It says I do not have an email account. How do I set this up?
The emailing function in Solocator calls up your default email account entered in the Apple Mail app. If you have not set up an email account using Apple Mail app, you will get a prompt saying you do not have an email account. Here are the steps to set up your email account to be used by the Apple Mail app and therefore used by Solocator when emailing photos/files. https://support.apple.com/en-au/HT201320
If you use another email app, you may select “Share photos” or “Export” via the share sheet and use an alternative email app. However, some information will not be added to the email body like the standard default function.
How do I email photos using email apps other than the Apple mail app?
If you wish to email photos via other email apps such as Gmail and Outlook, you need to use the share photos button or the customised Export/Share Button. When using either of these buttons, the share sheet opens so you can select the email app of your choice. However, some information will not be added to the email body like the standard default function. (Update 27 April 2022) – further Export/Share button options coming June 2022).
How to keep the photo metadata when emailing using Outlook?
Many users email via Outlook have found that the EXIF metadata is stripped from photos. To avoid this, email photos as one zip file as an attachment. This can be enabled from:
- Solocator Settings screen – scroll down near the bottom of the screen.
- The custom options list for the Email button and Export/Share button.
How do I email KML or KMZ files?
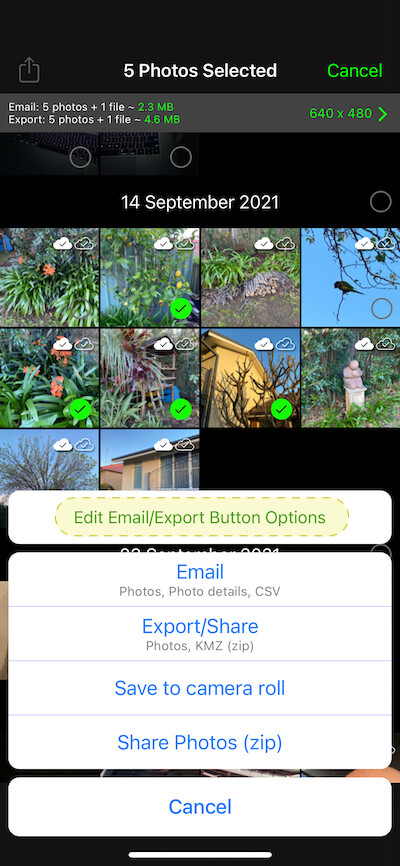 After selecting photos and tapping the action button bottom left in the Solocator library, tap on the edit email/export button options (yellow highlight). You can select from photos, photo info, maps, KML, KMZ and CSV files to either email or export. For a detailed step-by-step guide, click here or select the How To section.
Admin & Purchases
Is Solocator a One-Time purchase or Subscription?
Both the Standard Solocator app and the Industry Pack (available as an in-app purchase) are one-time charges with no ongoing subscription. This applies to both iOS and Android apps.
Why can't I transfer my purchase between iOS and Android (or vice versa)?
The iOS and Android versions of Solocator are both separate native apps on their respective platforms. There is no backend or login for Solocator, as each app is individually developed for its platform. While the app experience is similar, the “under the hood” technology is different for each operating system.
Purchases are tied to your Apple ID or Google Account, not to the Solocator app itself. Because these stores are owned by separate companies, licenses cannot be transferred between platforms. Each store requires its own license to support the ongoing development and maintenance of that specific version.
Can't get the Industry Pack to work on my Android device
If your Android device is not recognising the Industry Pack, please try either of the following:
- Close the app and then open it up again or
- Do a simple restart of your device to re-establish the link to Google Services.
- If you have multiple user accounts logged into the Google Play Store please see article Restoring Industry Pack (Android).
The above fixes the issue for most users. It could also be that you’re not in good cell coverage and unable to connect to Google Services.
How to restore my Industry Pack on my iPhone?
Both the standard app and Industry Pack are one-time purchases. To restore the Industry Pack scroll down in the Solocator Settings screen towards the bottom and tap on the Restore purchase button. That will get you going again. Also, if you tap onto the buy Industry Pack, Apple checks if you have purchased it before and asks if you would like to download it again for free. Apple requires developers to add a button to allow users to have the option to restore any purchases as opposed to us doing a straight check.
How do I get a receipt/invoice for my Solocator app purchase?
IOS
Please visit https://reportaproblem.apple.com/ and log in with your Apple ID.
Click on the app purchase document number (the link is on the right of your app purchase). Then click on “receipt” to open the invoice.
Android
Click the link below and follow the simple steps.
Can’t find what you’re looking for?
Contact us and we’ll get back to you as soon as possible