 Two Photos At Once
From v2.0, you can take two photos at once and autosave them to the camera roll. One with the stamped overlaid info and the other a full resolution original photo of the same shot. The stamped photos are also saved in the Solocator photo library. See options under Camera in the settings screen for how to save photos.
Capture Modes – Compass | Building | Street
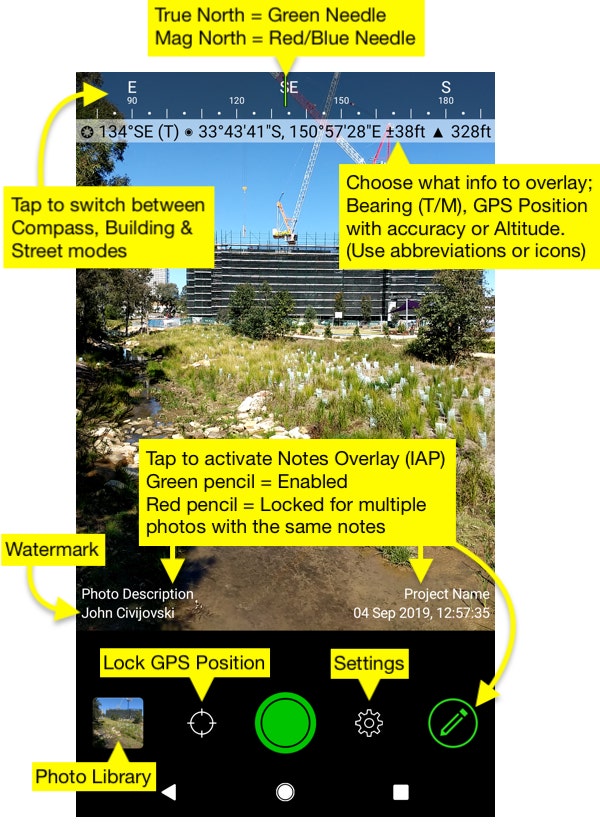
The app launches with the camera ready to take photos in either portrait or landscape. When first used, you will see a compass gauge at the top, referred to as compass mode showing the direction you are looking at – bearing. The flip side to this mode is building mode, which shows the cardinal & inter-cardinal direction of the building face you’re looking at or standing at. i.e. North Elevation of the building, home, building site, block of land etc. There is also a third option called street mode, which is part of the In-app purchase “Industry Pack” to stamp the street address onto photos. To toggle between these modes, tap at the top of the camera over the capture modes area. Photos will be stamped with the currently active mode. You can switch the modes off in settings if you have purchased the “Industry Pack” (IAP).
True/Magnetic North
When using compass mode, you can switch between True and Magnetic North from settings. They are graphically displayed as:
Green Needle = True North Red/Blue Needle = Magnetic North
From v2.0, True and Magnetic North are also shown in the GPS info bar.
GPS Info Bar
Overlay one or all of the following: GPS position (POS), altitude (ALT) or bearing direction (BRG) T/M. To customise, see under GPS info overlay in settings. From v2.0, you can show this info with Unicode icons for a cleaner look or switch back to abbreviations.
Note: having a clear view of the sky often improves accuracy.
Accuracy
From v2.0, GPS accuracy reading (±) of the current position was added to the info bar. You can refine and lock your position (part of Industry Pack) by swiping to the left screen. This option is ideal if you do field work around or inside large structures, buildings, homes etc. When the GPS position is locked, photos are taken with a green GPS info bar. Lock GPS Location is part of the “Industry Pack” (IAP).
Roll Indicator
Under settings (swipe to the right), you can choose to show a roll indicator or turn it off. The indicator works in portrait and landscape and will assist in getting more accurate bearings by keeping your photos level and plumb.
General Camera Functions
Zoom – pinch screen to zoom in or out (slider also appears)
Focus – Tap the screen where you want to focus. The camera will focus on the area you tapped to enhance the photo. You can also lock the exposure and focus by tapping on the area you wish to focus on.
Flash – Also under settings: Auto | On | Off
Photo Quality – In settings, you can choose between Low|Med|High quality for photos taken.
Notes Overlay: Project Name & Description (In-App Purchase)
The ability to add notes to be overlaid and stamped on the photos you take. This feature is part of the “Industry Pack” (IAP). The notes option is activated when the pencil button on the bottom right is green. When notes are active, a pop-up window appears after you tap the shutter button to prompt you to type a project name and a photo description. Notes fields remember your previous text, which is ideal when you want to retake the same photo or more than one with the same text. Notes can also be edited or added when viewing photos in the Solocator album.
If a project name is used when taking a photo, the project name can be used as a prefix to the filename when the photo is taken.
Red Pencil Button: The Red pencil button was added to lock Notes Overlay for taking multiple photos with the same Project Name and Photo Description. Tap pencil to go between grey, green and red.
Watermark (In-App Purchase)
The watermark text field was designed to stamp your name or company name to each photo taken or used with other permanent text to be stamped.
Settings Button: You can tap the settings button or swipe across the camera to get to the settings screen on the right.
Lock GPS Position Button: This button takes you to the Lock GPS Location screen or swipe across the camera to get to the same screen on the left.